|
| FDISK |
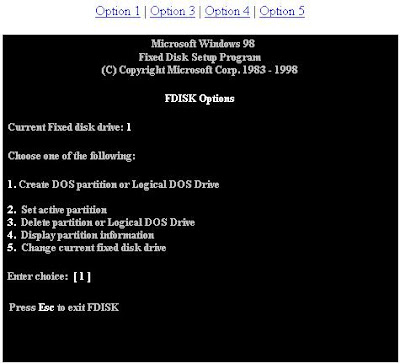
This is the main screen used during the time running FDISK. This would also be the first screen if your computer operating system does not support FAT32. From this window you will have the capability of setting up or removing partitions from your hard drive(s).
-----------------------------------------------------------------------------------------------------------------------------------
Using the options within this screen you will be able to create the various different partitions. These options will only allow you to create FAT16, and FAT32 partitions if supported and you pressed Y for Yes to enable large disk partitions. If you are attempting to create NTFS partitions, use Windows NT Disk Manager.
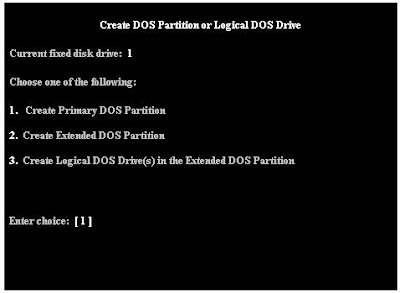
1. Create Primary DOS Partition - Choosing this option you will be prompted to use maximum space. If you specify yes, this will use up to 2 GB if creating FAT16 partitions, or up to 32 GB if using FAT32. If you choose no you will be able to specify how large you would like the partition to be. NOTE: you will need to create primary partitions before being able to create Extended or Logical DOS partitions.2. Create Extended DOS Partition - If you are using FAT16 and have a 2 GB or higher hard drive or have only specified a small portion of the hard drive as the Primary partition, use this option to create the Extended DOS partition(s) (other drive assignments). The Extended DOS partition will be used to hold the Logical DOS drives; therefore, use the maximum space left on the hard drive.3. Create Logical DOS Drive(s) in the Extended DOS Partition - This option is used after you have created an Extended DOS partitions. Once the Extended DOS partition has been created you then can specify the sizes of other partitions you wish to create.
Example of what has been explained above:
Bob has a six GB hard disk drive and wishes to divide the hard drive into three partitions, each using FAT 16.
Step 1. If prompted to use Large Disk support, press N for no because Bob does not want FAT32, he would like FAT16.Step 2. Choose option one to create a Primary partition. Once prompted to use maximum space, press N for no and specify 2 GB as the size of the primary partitions Step 3. Once the primary DOS partition has been created, choose option two to create an extended DOS partition. Use the maximum space, which would be four GB because two GB has already been used for the Primary Partition.Step 4. Create two logical DOS drives, each being 2 GB.Step 5. Reboot the computer and format each of the drives to allow them to be accessible.
Assuming Bob only had one hard drive, doing the above Bob would have:
Drive C: Partition 1 (Primary) FAT 16Drive D: Partition 2 (Extended/Logical) FAT16Drive E: Partition 3 (Extended/Logical) FAT16
Note: Once a primary partition has been created please ensure that you set the partition as an active partition.
-----------------------------------------------------------------------------------------------------------------------------------
Within this screen you will have the capability of deleting pre-existing DOS partitions. If you currently have no disk space available on your hard drive and wish to create additional partitions, you must first use this screen to delete the partitions and then you will be able to create partitions. NOTE: if you delete partitions, any information on those partitions will be erased and CANNOT be recovered.
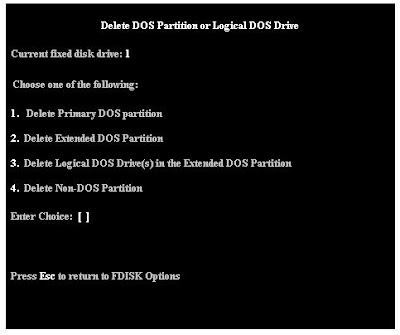
1. Delete Primary DOS partition - Use this option to delete your main primary partition. However, if you currently have any Extended / Logical DOS partitions, you must delete these partitions before you will be able to delete the Primary DOS partition.2. Delete Extended DOS partition - If you have your computer partitions into more than one drive, use this option to delete the extended dos partition(s). You must delete the Logical DOS Drive(s) before you can delete the Extended DOS partition.3. Delete Logical DOS Drive(s) in the Extended DOS Partition - This option would be used first if you have extended DOS partitions and wish to delete the extended partitions.4. Delete Non-DOS Partition - This option is usually used for partitions that either have been created by third-party applications, such as a DDO or other operating systems such as IBM Warp, Unix, as well as various other operating systems.
Bob has created three partitions on one hard disk drive; however, he would like to delete them all.
Step 1. Delete the two logical DOS drive(s) in the Extended DOS partition with Option number three.Step 2. Once the Logical DOS partitions have been deleted, choose option number two to delete the extended DOS partition.Step 3. Choose option one to delete the Primary partition.Step 4. Reboot the computer to allow above changes to take effect.
-----------------------------------------------------------------------------------------------------------------------------------
Within this screen you will be able to see what is currently being used and how your computer hard drive is setup. NOTE: If you see invalid information such as !, *, &, % as the Volume Label, the Partition, or the Status, it is a good possibility that you may have a VIRUS on the computer.
The above picture displays information about Extended DOS partitions; if, however, you only have a Primary DOS partition, your screen would only display the partition information and you will only have the option to Esc out of the screen. -----------------------------------------------------------------------------------------------------------------------------------
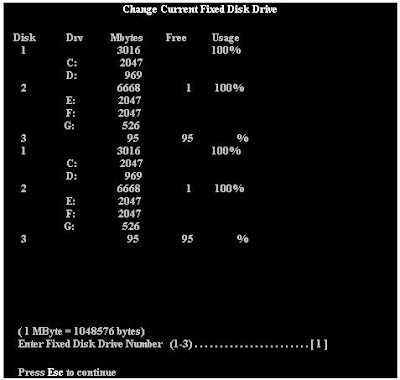
This option is only available if more than one Hard Drive is installed within the computer. In the below picture you can notice that we have 3 hard drives listed within this computer. Disk 1 has two partitions, which are C: and D: The hard drive's total space is 3 GB. Then Disk 2 has three partitions E:, F:, and G: and the hard drive total space is 6668, or 7 GB. As you notice in the below picture, there is also a Disk 3, this is actually an Iomega Zip Drive hooked up to the IDE controller on the Motherboard. Other media that is connected to the IDE controller within your computer will usually be displayed within FDISK; however, this is not a hard drive and does not need to be FDISKed, this is why 95MB is free. An exception to this rule would be a CD-ROM.
Labels: assignment #2 |
|
|
|
| Intel® Desktop Board D975XBX2 |
Intel® Desktop Board D975XBX2

If you've got the POWER…the SPEED…the PERFORMANCE on your team, then you've got the WINNING EDGE. With the Intel® Desktop Board D975XBX2, supporting the Intel® Core™ 2 Extreme processor, your desktop PC will become the ultimate weapon. You will scream through the latest games, level after level. Add the world's best gaming processor and the D975XBX2 to your game strategy - a combination so BAD that it's GOOD. The Intel® Desktop Board D975XBX2 is Microsoft Windows Vista* Premium Ready. The Intel® 975X Express Chipset fully supports the visually stunning Windows Aero* user interface with amazing transition effects and realistic animations.Click to EnlargeView Available ConfigurationsGet Windows* Hardware Quality Labs (WHQL) InformationView Industry SpecificationsView Regulatory Compliance InformationIntel® Desktop Board D975XBX2 FeaturesFeaturesBenefitsForm FactorATX (12.00 inches by 9.60 inches [304.80 millimeters by 243.84 millimeters])ProcessorSupport for Intel® Core™2 Extreme processor in an LGA775 socket with a 1066 MHz system busSupport for an Intel® Core™2 Duo processor in an LGA775 socket with a 1066 MHz system busSupport for an Intel® Pentium® Processor Extreme Edition in an LGA775 socket with a 1066 or 800 MHz system busSupport for an Intel® Pentium® 4 Processor Extreme Edition supporting Hyper-Threading Technology† (in an LGA775 socket with a 1066 MHz system bus)Support for an Intel® Pentium® D processor in an LGA775 socket with an 800 MHz system busSupport for an Intel Intel® Pentium® 4 processor supporting Hyper-Threading Technology† (in an LGA775 socket with an 800 MHz system bus)View all supported processorsMemoryFour 240-pin DDR2 SDRAM Dual Inline Memory Module (DIMM) socketsSupport for DDR2 800, DDR2 667, or DDR2 533 MHz DIMMsSupport for up to 8 GB of system memorySupport for ECC and non-ECC memoryChipsetIntel® 975X Express ChipsetAudioIntel® High Definition Audio subsystem in one of the following configurations:8-channel (7.1) audio subsystem with five analog audio outputs and two S/PDIF digital audio outputs (coaxial and optical) using the Sigmatel* 9274D audio codec6-channel (5.1) audio subsystem with three analog audio outputs using the Sigmatel 9227 audio codecATI* CrossFire* Multi-GPU Platform SupportATI CrossFire technology enables two ATI graphics cards to work together for ultimate 3D gaming performance and visual qualityI/O ControlLegacy I/O controller for diskette drive, serial, parallel, and PS/2* portsLAN SupportGigabit (10/100/1000 Mbits/sec) LAN subsystem using the Intel® 82573E/82573L Gigabit Ethernet ControllerPeripheral InterfacesEight USB 2.0 portsFour Serial ATA interfaces with RAID support (four additional interfaces available with optional discrete RAID controller)One parallel ATA IDE interface with UDMA 33, ATA-66/100 supportOne diskette drive interfaceOne serial portOne parallel portPS/2* keyboard and mouse portsExpansion CapabilitiesTwo PCI Conventional* bus add-in card connectors (SMBus routed to both PCI Conventional bus add-in card connectors)One Primary PCI Express* x16 (electrical x16 or x8) bus add-in card connectorOne Secondary PCI Express* x16 (electrical x8) bus add-in card connectorOne PCI Express* x16 (electrical x4) bus add-in card connectorMicrosoft Vista* Premium ReadyWith a PC built with Intel® Core™2 Duo or Intel® Core™2 Quad processors, and the Intel® Desktop Board, you can experience a more responsive and manageable environment of Microsoft Windows Vista* including a new visual sophistication of the Windows Aero* interface.Related ProductsProcessorsIntel® Core™2 Extreme processorIntel® Core™2 Duo processorIntel® Pentium® Processor Extreme EditionIntel® Pentium® 4 Processor Extreme Edition supporting Hyper-Threading Technology†Intel® Pentium® D processorIntel® Pentium® 4 Processor supporting Hyper-Threading Technology†ChipsetsIntel® 975X Express ChipsetAdaptersIntel® 600SM PCI Phone Adapter† Hyper-Threading Technology (HT Technology) requires a computer system with an Intel® Processor supporting HT Technology and an HT Technology enabled chipset, BIOS, and operating system. Performance will vary depending on the specific hardware and software you use. See www.intel.com/products/ht/hyperthreading_more.htm for more information including details on which processors support HT Technology. |
|
|
|
| Intel® Core™ Duo Processor |
 Intel® Core™ Duo Processor Intel® Core™ Duo Processor
Intel® Core™ Duo ProcessorNew power, new speed. Quad-core from Intel.Leaders of the pack seeking monster performance, look no further. With four execution cores, the Intel® Core™2 Quad processor blows through processor-intensive tasks in demanding multitasking environments and makes the most of highly threaded applications. Whether you're creating multimedia, annihilating your gaming enemies, or running compute-intensive applications at one time, new quad-core processing will change the way you do everything. Pioneer the new world of quad-core and unleash the power of multithreading.All Intel® Core™2 Quad processors feature:Intel® Quad-core TechnologyIntel® Virtualization Technology±Intel® Enhanced Intel SpeedStep® TechnologyIntel® Execute Disable Bit°Intel® 64-bitΦDesktop processor specificationsProcessor NumberΔCacheClock SpeedFront Side Bus65 nmQ66008 MB L22.40 GHz1066 MHzGet detailed specificationsDesktop Product Comparison Chart ›Compare Intel® Core™2 Quad processors to other Intel® desktop processors and get chipset and motherboard information.Processor Spec Finder ›Get the detailed technical specifications of each Intel® Core™2 Quad processor.± Intel® Virtualization Technology requires a computer system with an enabled Intel® processor, BIOS, virtual machine monitor (VMM) and for some uses, certain platform software enabled for it. Functionality, performance or other benefits will vary depending on hardware and software configurations. Intel Virtualization Technology-enabled BIOS and VMM applications are currently in development.° Enabling Execute Disable Bit functionality requires a PC with a processor with Execute Disable Bit capability and a supporting operating system. Check with your PC manufacturer on whether your system delivers Execute Disable Bit functionality.Φ 64-bit computing on Intel® architecture requires a computer system with a processor, chipset, BIOS, operating system, device drivers and applications enabled for Intel® 64 architecture. Processors will not operate (including 32-bit operation) without an Intel 64 architecture-enabled BIOS. Performance will vary depending on your hardware and software configurations. Consult with your system vendor for more information.Δ Intel processor numbers are not a measure of performance. Processor numbers differentiate features within each processor family, not across different processor families. See www.intel.com/products/processor_number/ for details.Intel® Core™2 Extreme Quad-Core Processor QX6700Δ and Intel® Core™2 Quad Processor Q6000Δ Sequence Specification Update— on 65 nm Process in the 775-land LGA Package supporting Intel® 64 architecture and Intel® Virtualization Technology± This document is an update to the specifications contained in the Intel® Core™2 Extreme Quad-Core Processor QX6700Δ and Intel® Core™2 Quad Processor Q6000Δ Sequence Datasheet. This document is a compilation of device and documentation errata, specification clarifications and changes. It is intended for hardware system manufacturers and software developers of applications, operating systems, or tools. 64-bit computing on Intel architecture requires a computer system with a processor, chipset, BIOS, operating system, device drivers and applications enabled for Intel(R) 64 architecture. Processors will not operate (including 32-bit operation) without an Intel(R) 64 architecture-enabled BIOS. Performance will vary depending on your hardware and software configurations. Consult with your system vendor for more information. Δ Intel processor numbers are not a measure of performance. Processor numbers differentiate features within each processor family, not across different processor families. See www.intel.com/products/processor_number/ for details.‡ Not all specified units of this processor support Enhanced Intel SpeedStep® Technology. See the Processor Spec Finder at http://processorfinder.intel.com or contact your Intel representative for more information.± Intel® Virtualization Technology requires a computer system with an enabled Intel® processor, BIOS, virtual machine monitor (VMM) and for some uses, certain platform software enabled for it. Functionality, performance or other benefits will vary depending on hardware and software configurations. Intel Virtualization Technology-enabled BIOS and VMM applications are currently in development. ° Enabling Execute Disable Bit functionality requires a PC with a processor with Execute Disable Bit capability and a supporting operating system. Check with your PC manufacturer on whether your system delivers Execute Disable Bit functionality. |
|
|
|
| AMD Athlon™ 64 FX Processor |
AMD Athlon™ 64 FX Processor

Bring the next generation of digital media and games to lifeShop AMD
The world's ultimate processor for PC enthusiastsFeaturing AMD’s most advanced processor technology, the AMD Athlon™ 64 FX processor is designed specifically for PC enthusiasts. Powering the AMD Quad FX platform with Dual Socket Direct Connect Architecture, AMD Athlon 64 FX processors enable enthusiasts to immerse themselves in their digital world. They can play games at a level previously only reserved for the world of simulations, create and manipulate digital media like a pro, and explore the possibilities of megatasking. The AMD Athlon 64 FX processor brings the next generation of digital media and games to life.
AMD Athlon™ 64 FX Processor and AMD Quad FX Platform Product BriefThe AMD Quad FX Platform with Dual Socket Direct Connect Architecture powered by AMD Athlon 64 FX processors is the world’s ultimate PC platform for megatasking enthusiasts tag, as close to the beginning of it as possible-->
var axel = Math.random()+"";
var a = axel * 10000000000000;
document.write('');
tag, as close to the beginning of it as possible-->
var axel = Math.random()+"";
var a = axel * 10000000000000;
document.write('');
AMD Athlon™ 64 FX Processor and AMD Quad FX Platform Overview Featuring AMD’s most advanced processor technology, AMD Athlon™ 64 FX processors are designed specifically for PC enthusiasts. AMD Athlon™ 64 FX processors enable enthusiasts to immerse themselves in their digital world. They can play games at a level previously only reserved for the world of simulations, create and manipulate digital media like a pro, and explore the possibilities of megatasking – running multiple demanding applications at once. The AMD Athlon™ 64 FX processor brings the next generation of digital media and games to life. AMD Athlon 64 FX processors power the next innovation for the enthusiast PC platform: The AMD Quad FX platform with Dual Socket Direct Connect Architecture. The Revolutionary AMD Quad FX platform is the first dual-socket, multi-core PC platform designed to take advantage of the latest enhancements in Windows Vista™ Ultimate and for megatasking PC enthusiasts and power-users who run the most demanding tasks simultaneously. The AMD Quad FX platform with Dual Socket Direct Connect (DSDC) Architecture is ready for the most demanding multi-threaded digital content creation software and for the next wave of incredibly demanding multi-threaded games. DSDC Architecture is AMD’s exclusive high-bandwidth interconnect for two AMD Athlon 64 FX processors. The AMD Quad FX platform featuring two AMD Athlon™ 64 FX dual-core processors with DSDC Architecture for megatasking can double your digital media application performance over two core platforms. Adding another processor doubles the cores, doubles available memory bandwidth—up to 25.6GB/s, and doubles the amount of high-speed on-die cache. With the AMD Quad FX platform you are ready for the multi-core, multi-threaded future. The AMD Quad FX Platform is designed to offer a seamless upgrade path from dual-core processors to quad-core processors when they are available in 2007. This offers an advanced four core platform today and a planned eight core platform in the future. Feature OverviewDual Socket Direct Connect (DSDC) Architecture powers the ultimate platform for the megatasking enthusiast
DSDC Architecture is AMD’s exclusive high-bandwidth interconnect for two multi-core processors
Designed to perform with multi-threaded software
Integrated memory controller designed to reduce memory access latencies
Runs today’s 32- and 64-bit software with leading-edge performance HyperTransport™ technology
Helps provide increased overall system performance with up to a 2000MHz system bus AMD Virtualization™ (AMD-V™)
Chip-based virtualization technology that helps virtualization software run more efficiently and securely Enhanced Virus Protection*
Helps protect against certain viruses, worms, and other malicious attacks Redefine Performance Performance is not just a question of running one application at jaw-dropping speed. It is about a computing experience that lets you run multiple processor intensive and multithreaded applications responsively at top speed. Megatasking is that experience. Megatasking is about playing the latest life-like game while instant messaging, creating, editing or enjoying your favorite digital media. Megatasking is about keeping your creative flow moving and bringing your ideas to life with high-definition video editing, content creation, digital imagery, and audio mixing. You can work on multiple pieces of your project simultaneously and don’t have to stop creating while waiting for a filter to apply. Megatasking is about running a dedicated game server on your PC while playing the game on the same PC, while voice chatting, while playing your own soundtrack and still being able to alt-tab to other basic apps like your e-mail, IM, or browser without a hitch. Megatasking is about streaming HD quality video to media extenders through out your home and still being able to play or create on the same PC with robust performance. Megatasking is the future reality of PC performance. Explore the possibilities. Your processor should not just be adequate—it should exceed your demands. AMD Athlon™ 64 FX processors enable performance tuning, so you can discover the true potential of your personal computer. Break the speed limit; it’s YOUR processor! A fast processor is one thing, but a fast computer system is another. HyperTransport™ technology featured on AMD Athlon™ 64 FX processors is key. With 2000MHz bi-directional HyperTransport™ technology on each processor, you have fast, low-latency connections in your computer system. With free flowing data, you can feel confident your applications can operate at their maximum potential. Purchase With Confidence Founded in 1969, AMD has shipped more than 300 million PC processors worldwide. Customers can depend on AMD and the AMD Athlon 64 FX processor for compatibility and reliability. AMD processors undergo extensive testing to ensure compatibility with Microsoft Windows XP, Windows 98, Windows ME, Windows NT®, Windows 2000, as well as Linux and other PC operating systems. AMD works collaboratively with Microsoft and other partners to achieve compatibility and reliability of AMD processors and to expand the capability of software and hardware products leveraging AMD64 technology. AMD conducts rigorous research, development, and validation to help ensure the continued integrity and performance of its products.
AMD Athlon™ 64 FX ProcessorKey Architectural Features
AMD64 technology enables leading-edge software performance and new experiences & capabilities. Specifically, AMD64 technology:
Provides high performance levels without any changes to existing 32-bit applications
Allows both high-performance 32-bit and 64-bit computing, offering end users an easy, compelling and affordable means to take advantage of tomorrow's emerging applications
Additional 64-bit internal registers for computing performance
Addressability beyond 4GB for new capabilities
Enhanced Virus Protection*HyperTransport™ technology
HyperTransport™ technology with a 2000MHz bidirectional double data clock rate provides a fast and low latency connection in your computer system. With free flowing data, you can feel confident your applications can operate at their maximum potential The Integrated double data rate (DDR and DDR2) memory controller designed to reduce memory latency.
Designed for performance by directly connecting the processor to the memory
Supports industry-standard, widely-available DDR memory modules for high-performance systems
Features ECC protection that enables increased system reliability, helping to ensure your systems run smoothlyHigh-Performance, On-Die Cache
The AMD Athlon 64 FX processor features a large high-performance on-die cache memory. The 2304KB (128KB L1 + 1024KB L2 per core) of total usable cache is designed to improve instruction throughputAMD Digital Media XPress™ support for SSE, SSE2, SSE3 and MMX instructions
With the addition of SSE3 instructions to existing 3DNow!™ Professional technology, the AMD Athlon 64 FX processor is compatible with the largest installed base of multimedia-enhanced software. Software specifically tuned for this suite of instructions can give me smooth, rich, lifelike images, precise digital audio and an enriched Web experience
* Enhanced Virus Protection can be enabled by certain operating systems, including the current versions of Microsoft® Windows®, Linux®, Solaris™, and BSD Unix. After properly installing the appropriate operating system release, users must enable the protection of their applications and associated files from buffer overrun attacks. Consult your OS documentation for information on enabling EVP. Contact your application software vendor for information regarding use of the application in conjunction with EVP. AMD strongly recommends that users continue to include third-party antivirus software as part of their security strategy. © 2006 Advanced Micro Devices, Inc. AMD, the AMD Arrow logo, AMD Athlon, 3DNow!, AMD Digital Media Xpress, Cool'n'Quiet, and combinations thereof, are trademarks of Advanced Micro Devices, Inc. HyperTransport is a licensed trademark of the HyperTransport Technology Consortium. Linux is a registered trademark of Linus Torvalds. Microsoft and Windows are registered trademarks of Microsoft Corporation in the U.S. and/or other jurisdictions. Other names are for informational purposes only and may be trademarks of their respective owners. |
|
|
|
| How to Format Using MS-DOS Command |
Now that you have created all of the partitions for your hard drive, it is now time to format them. To format a master hard disk, you will use the format command. Formatting prepares a hard drive for use by organizing its storage space into addresses that can be recognized and accessed.
Below are the complete instructions to walk you through the process of formatting partitions on your hard drive.
1.) Restart your computer with the Startup/Boot disk in the floppy disk drive.
**NOTE:**If you are using a Windows 95 Startup disk, a command prompt is displayed and you can skip to step 2. If you are using a Windows 98, Windows 98 Second Edition, or Windows Me Startup disk, select the Start computer without CD-ROM support menu option when the Windows 98 Startup menu is displayed.
2.) When a command prompt is displayed, type format c: /s, and then press ENTER. This command transfers the system files and should only be used when you format drive C (or your "active" drive). **NOTE** (If you are formatting with an Windows ME boot disk you cannot use the /s switch. Windows ME will not let you transfer system files to a disk without an operating system already present.) For all other partitions, type format drive: (where drive is the letter of the partition that you want to format).
3.) When you successfully run the format tool, you receive the following message:
WARNING, ALL DATA ON NON-REMOVABLE DISK DRIVE C: WILL BE LOST!Proceed with Format?
4.) Press Y, and then press ENTER to format drive C.
5.) After the format procedure is finished, you receive the following message:
Volume label (11 characters, ENTER for none)?
**NOTE:**This is an optional feature that you can use to type a name for the drive. You can either type an 11-character name for the drive, or you can leave it blank by pressing Enter.
6.) Reboot. You are now ready to install your operating system.
Source:
Publish date: 28th July 2005Written by: TheoranAudience intended for: Windows ME Users, Windows 98 Users, Windows 95 Users
http://www.cybertechhelp.com/tutorial/article/how-to-format-a-partition
FORMAT
Type: External (1.0 and later)
Syntax:
FORMAT d:[/1][/4][/8][/F:(size)] [/N:(sectors)] [/T:(tracks)]
[/B|/S][/C]
[/V:(label)] [/Q][/U][/V]
Purpose: Formats a disk to accept DOS files.
Discussion
Formats the disk in the specified drive to accept DOS files, analyzing the
entire disk for defects.
Initializes the directory and file allocation tables. Can be used to
format both diskettes and fixed disks.
NOTE:
In some earlier versions of DOS, the drive designation letter was
optional. If you are using one of these versions, you can format a
diskette or a FIXED DISK if you enter FORMAT while working in that drive.
For more information on using the FORMAT command, refer to Chapter 2,
Using Common DOS Commands.
Options
/1 - Format for single-sided use, regardless of the drive type.
/4 - Formats a double-density diskette in a high-density type disk drive.
Files written to a double-sided disk using a high-density drive may not be
reliable.
/8 - Formats at 8 sectors per track. If /8 is not specified, FORMAT
defaults to 9 or 15 sectors per track, depending upon the disk drive type.
The /V option cannot be used with the /8 option.
/F:(size) - Formats disks to specific sizes. You can specify the target
disk to be a size value from 160Kb to 2.88Mb. Do not format a floppy disk
at a size higher than it was designed for.
/N:(sectors) - Specifies the number of sectors per track on the disk.
Used to format a 3.5 inch disk with the number of sectors per track
specified using this option. For 720 K-byte disks, this value should be
entered as ÒN:9.Ó
/T:(tracks) - Specifies the number of tracks on the disk. Used to format
a 3.5 inch disk with the number of tracks specified using this option.
For both 720 K-byte disks and 1.44 K-byte disks, this value should be
entered as T:80.
/B - Formats a disk reserving room on the disk to later copy the DOS
system files.
/S - Copies the operating system files to the disk after formatting.
These system files are hidden files and will not appear in a directory
listing. Using some versions of DOS, this must be the last option
entered.
/C - Causes FORMAT to retest badclusters, otherwise FORMAT will mark the
clusters as bad but will not retest them. (In DOS versions before
Version 6, FORMAT always retested any bad clusters.)
/V:(label) - Causes FORMAT to prompt for a volume label after the disk is
formatted. The label can be of 1 to 11 characters. The same characters
acceptable in filenames are acceptable in the volume label (however, you
cannot add a filename extension). The /8 option cannot be used with the
/V option. DOS Version 5 automatically assigns Label as the disk label and
creates a unique serial number in the boot sector of the disk. The serial
number is displayed at the end of the formatting process.
/Q - Provides a quick way to format a disk . This option erases the file
allocation table and the root directory, but does not identify bad
sectors.
/U - Completely erases all data on the target disk making it impossible to
perform an UNFORMAT later.
/V - Displays a prompt so that a volume label can be entered.
Example
If you want to format a floppy disk as a double-density disk in a 1.2M
drive, you should enter the following:
format a:/4
Back to the
Easy DOS Command Index
|
|
|
|
| How to Partition Using MS-DOS Command Prompt |
Now that you have removed all of the partitions from your hard drive, it is now time to partition your hard drive. To partition a master hard disk, you will use the fdisk command. Fdisk is a DOS and Windows utility that is used to partition a hard disk, which is necessary before high- level formatting.
Below are the complete instructions to walk you through the process of creating partitions on your hard drive.
1.) Insert the Startup disk in the floppy disk drive, restart your computer. When the Microsoft Windows 98 Startup menu is displayed, select the Start computer without CD-ROM support menu option, and then press Enter.
At a command prompt, type fdisk, and then press Enter.
2.) Do you wish to enable large disk support?
Press Y and then press Enter. This will enable the FAT32 file system
3.) After you press Enter, the following fdisk options menu is displayed:
Create DOS partition or Logical DOS Drive
Set active partition
Delete partition or Logical DOS Drive
Display partition information
Change current fixed disk drive
**Note** that option 5 is available only if you have two physical hard disks in the computer.
4.) Press 1 to select the Create DOS partition or Logical DOS Drive menu option, and then press Enter.
5.) Press 1 to select the Create Primary DOS Partition menu option, and then press Enter.
6.) After you press Enter, you receive the following message: Do you wish to use the maximum available size for primary DOS partition?
A.) After you receive this message, use the following method:
B.) Press Y if you want all of the space on the hard disk to be assigned to drive C, press Y, and then press Enter. Go to Step 7
C.) Press N if you do not want all of the space on the hard disk to be assigned to drive C.
a.) If you select N then continue to follow these instructions.
b.) Enter the size of the partition you wish to make and then press Enter.
c.) Press ESC.
d.) Press 1 to select the Create DOS partition or Logical DOS Drive menu option, and then press Enter.
e.) Press 2 to select the Create Extended Partition menu option, and then press Enter.
f.) Press Enter to create an extended DOS partition that uses up the rest of the hard drive.
g.) Press ESC. After pressing ESC fdisk will automatically try to create a logical DOS drive.
h.) Enter the size of the second partition you wish to create and then press Enter.
i.) If you created your second partition to use the entire size of the Extended DOS Partition then go to Step 7.
J.) If not then repeat step h until you have used up the rest of the Extended DOS Partition then go to Step 7.
7.) Press ESC, and then press ESC to quit the fdisk tool and return to a command prompt.
8.) Reboot. You are now ready to format the partitions that you just created.
Source:
Publish date: 28th July 2005Written by: TheoranAudience intended for: Windows ME Users, Windows 98 Users, Windows 95 Users
http://www.cybertechhelp.com/tutorial/article/how-to-create-partition-using-fdisk |
|
|
|
|
|
|
|


